 The First Trip.
Trip Distance = 339Klm's
Total Distance From New = 370Klm's.
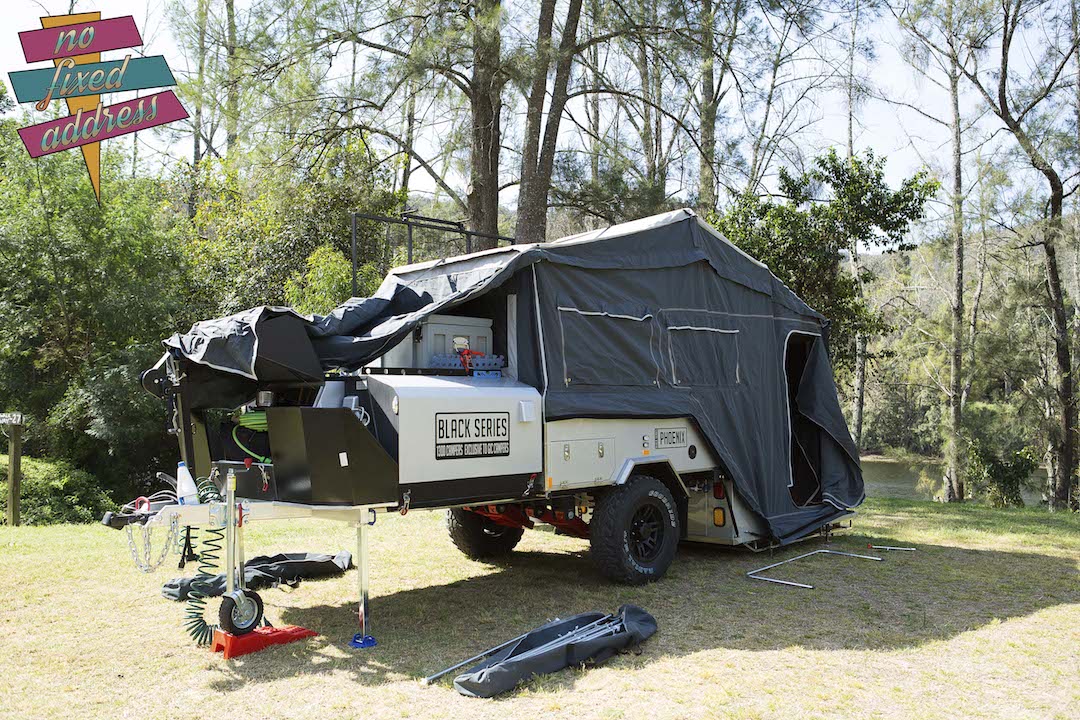
We decided that we'd head to Grady's Riverside Retreat, located on the Shoalhaven River 18 kilometres west of Nowra. It's become our favourite place to camp this year, with its large grassy sites right on the river, clean amenities, cheap firewood and only a short two and a half-hour drive from home, there's a lot of positives. We were excited about setting up the Pheonix for the first time and finding a place for everything that we would need when we hit the road come May 2018. We arrived at about lunchtime on Friday and the first thing was to try and level the trailer and whilst the ground may look relatively flat you soon find out how bad a judge the eyes are. We ended up having to put one of our levelling ramps under the dolly wheel to get height at the front that we needed. Once done we lowered the front support struts before un-latching the boat rack and flipping it up into its vertical position on the right-hand side of the trailer. There's a kind of keyway locking arrangement to stop the rack from falling back towards the tent when it is set up, it works well enough but was a bit of a challenge come pack up time being quite stiff to release. We're hoping this get's a little easier with use and maybe a little Inox won't go astray either.
 Next step is to unlatch the spare wheel and swing it out of the way. It opens out at a ninety-degree angle from the side of the trailer when fully opened and for some peculiar reason there is no safety device for locking it securely into this position, a project for the future perhaps. The number plate light wiring also runs around the hinge and you need to take care and hold the wiring down below the pivot point to prevent the spare wheel bracket from ripping the wire in two as you swing the wheel out of the way. Once this is done though you're good to remove the annex poles from the storage boxes on top of the trailer, one on each side. This proved easier said than done as the canvas bags that hold the poles are quite heavy and of course, they are located above shoulder height, so lifting them out for the first time immediately had us thinking about somewhere a little more convenient for the trip home and future use. Even if you don't plan on setting up the annex the poles need to be removed as they are too heavy to leave in situ when setting up the tent component of the camper.
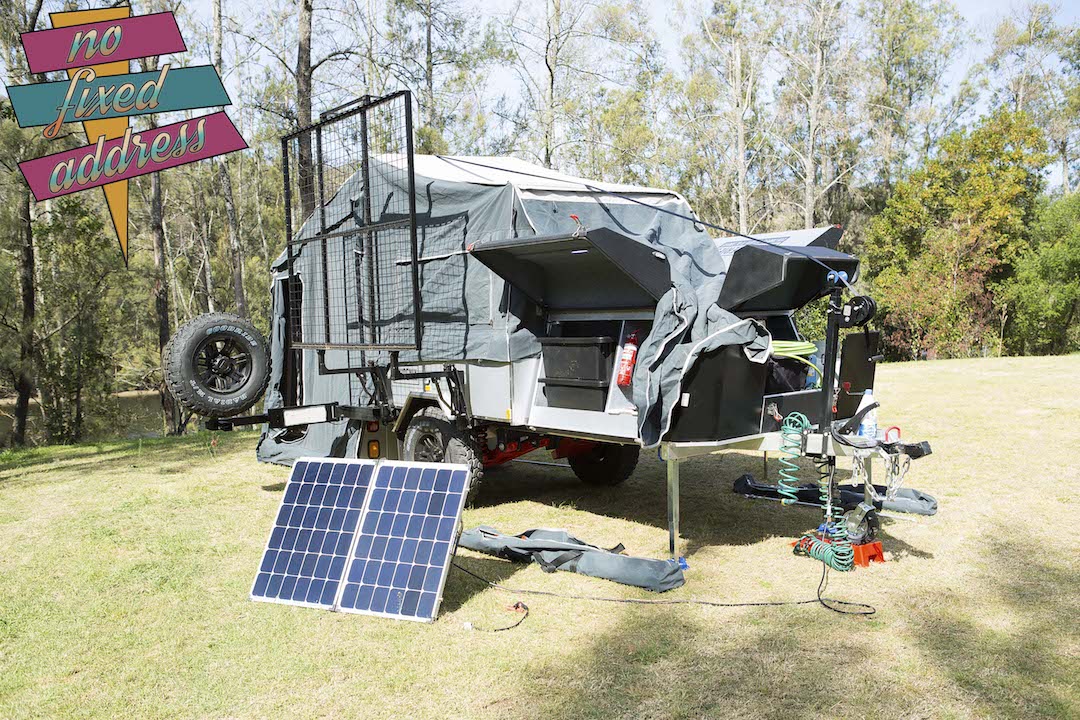
It was now time to flip the lid on the trailer to set up the tent proper. We connected the winch strap, which is a bit of a cumbersome affair as the eyelet that it needs to be attached to is just out of arms reach and you find yourself having to climb on the trailer to do it, but I'm confident it will get easier the more we use it. We un-latched the floor support frame and lifted it to the vertical position, gave it a gentle tug and the main part of the tent began to raise. With Rainey on the winch, I watched as she cranked it out and the tent opened up. We needed to get four poles out for each of the corners of the tent and once in position, we extended all of the poles up into position. Problems? Sure, a couple of niggling issues that have now been dealt with. Firstly the tent had not been positioned correctly at the factory and we spent about twenty minutes pushing, pulling and cursing it back into position. Secondly, the cabling for the LED strip lighting is taped to the inbuilt poles of the tent but had been done in such a way that it didn't allow the poles to be extended, a five-minute fix but to be honest it should never have left the factory like that. It took about an hour on this occasion to get the tent sleep ready but I'm sure we can get it down to around the ten to fifteen-minute mark once our routine is sorted.
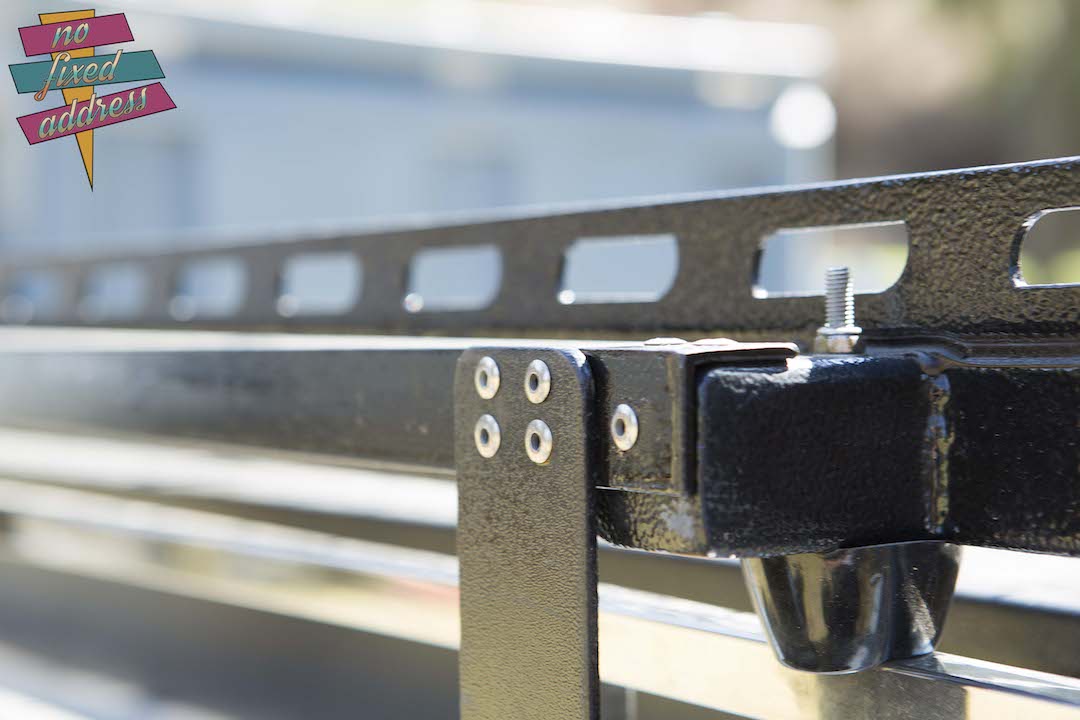 Now it was time to have a good look at the trailer. Starting with the boat rack and floor support brace where we found a few fabrication issues that may require some form of modifying and/or repairs in the future. The boat rack bracket that latches to the main body of the trailer is pop-riveted together with what appears to be aluminium rivets (See Image). Experience tells me that vibration is the enemy of aluminium and I can see these rivets vibrating themselves into the next life as we tackle the corrugated roads and tracks that we plan on traversing on our next big lap. Ideally, this should be welded and at some point, we may end up welding it dependant on how it travels but I would expect something like this to be taken care of and the point of manufacture. Clearly, this method of fabrication has been chosen as a cost-saving one, seriously though wouldn't you just add a hundred bucks to the asking price and build it properly? The other issue with the boat rack is the state of it, the mesh base has a bunch of bends and buckles in it where it's been walked on at the factory, again showing an overall lack of care for the product during the assembly and subsequent storage phase of the trailer.
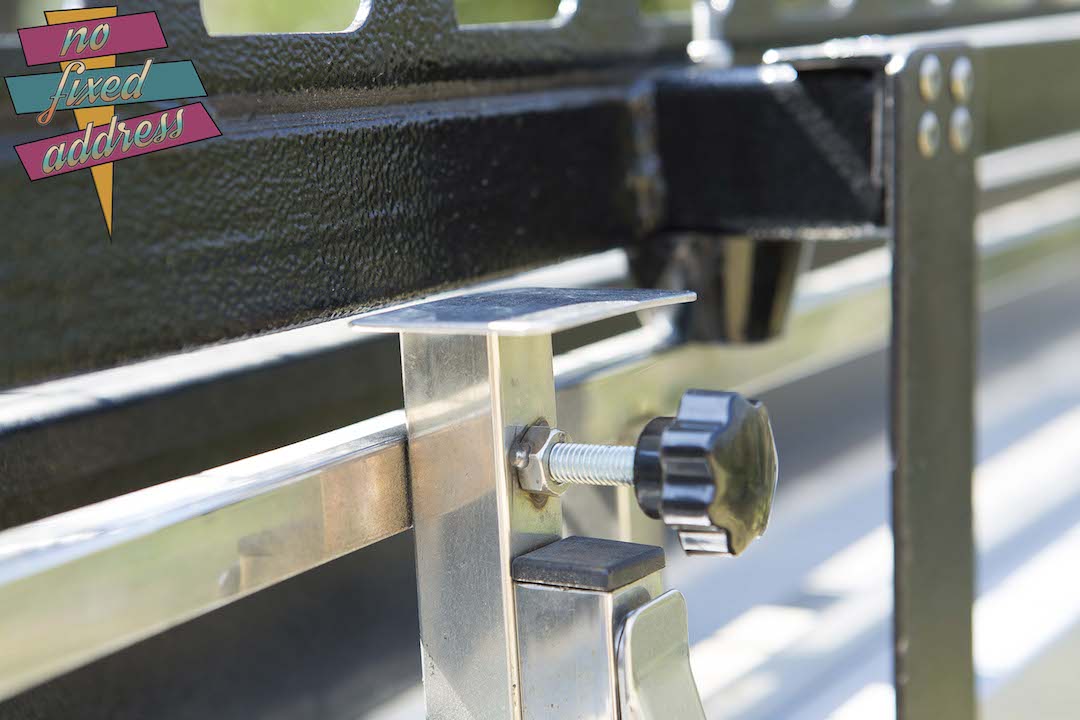 The first thing I thought of when I saw the levelling legs for the hard floor was that they would have to be removed for travel as the bolts would surely vibrate loose over corrugated roads. Whilst our short 340 KLM round trip over sealed roads last weekend was not enough to test the theory it's still one I'm concerned about and as such will get into the habit of removing the feet and carrying them in one of the many storage boxes for transit. A more disappointing aspect was the integrity of the feet when putting them to use. It would appear to be impossible to tighten the bolts enough to stop the legs from sliding back up into their housing when the floor gets stepped onto and as such we ended up having to chock the floor of the trailer with blocks of wood, poor design indeed. I think I'm going to drill some holes into the leg itself allowing the thread of the locking bolt to go through the leg instead of just up against it. There are a couple of issues with this solution one being that the holes will need to be spaced far enough apart so as not to interfere too much with the structural integrity of the legs, I'm thinking about 10mm of material between holes should be enough but then, of course, you lose the infinite adjustability of the leg. I'm thinking it will become a four or five position item once done but when you consider that there will only be a 10 mm gap between settings it's shouldn't be that much of a concern. The one that is a concern is the damage that will inevitably occur on the thread of the bolt with the leg pressing on it as you step in and out of the trailer, I don't have an answer for this one yet but I'm thinking a sliding pin would have been a better solution. I'll keep you posted on this one.
 On a more positive note, the storage available on the Black Series Pheonix is immense and one of the main reasons for us going with the rear fold over the forward fold models on offer. Starting with the left hand or, near side of the trailer, you have the slide-out kitchen, fridge slide and pantry area of the trailer. As I mentioned here in our previous article the kitchen itself is a cracker and there's not a lot to report other than the poorly designed cutlery storage tray. The other thing is that the slide-out shelf from under the cooktop appears to fairly lightweight in its construction so we need to be aware of overloading it with heavy dishes. The fridge slide easily accommodates our 65-litre Waeco fridge and leaves enough room in front of it for pots and pans. The slide-out pantry has three draws the smallest of which we have used for our plates cups and bowls. The next smallest at the top of the unit is big enough to hold frequently used items like tea and coffee, salt & pepper and condiments. Underneath this is a very deep draw for which we have sourced a couple of plastic tubs from the bargain store. The shallower bottom unit has a lid so the deeper unit can sit on top of it, these can be inverted if we decide the shallower unit would be better on top. Again we keep more frequently used items in the top and simply lift this out should we need to access the less frequently used bits and pieces in the bottom.
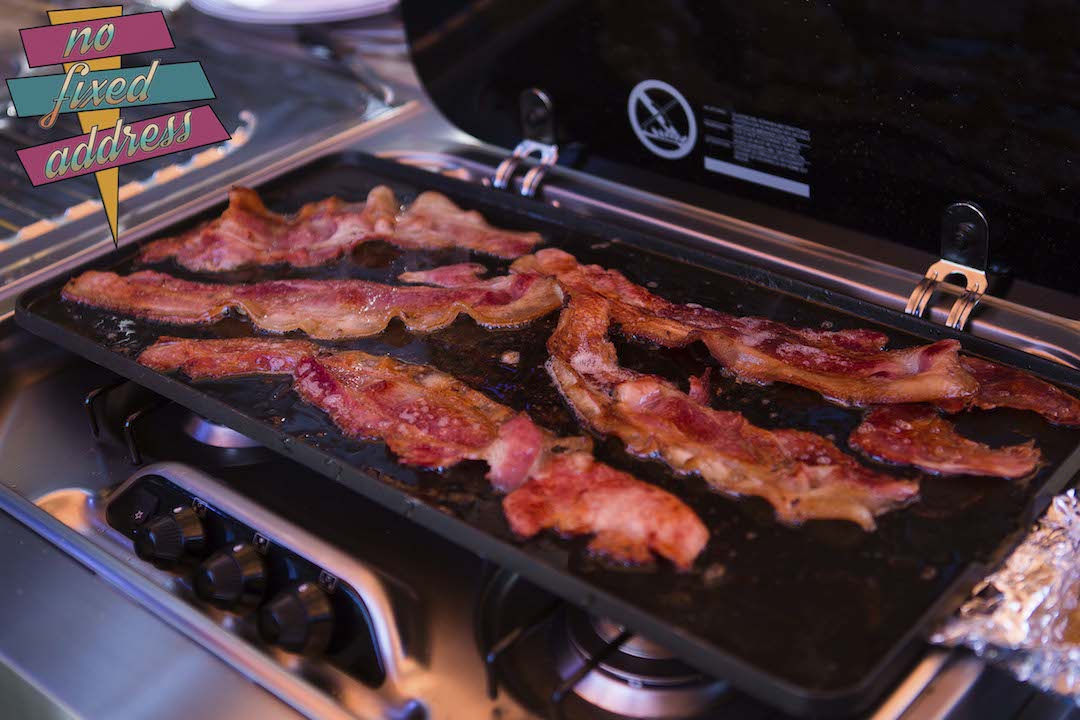 We found that the hotplate from our Coleman three burner stove fits on top of the Dometic three-burner stove supplied with the Pheonix and it makes cooking the morning bacon and eggs a snap. It's handy little addition to the kit that is lightweight and easy to clean. We have purchased a Voyager portable BBQ from the 4WD Supa Centre that fits perfectly on to the shelf on the slide-out pantry unit. It has just arrived so I'll post a review of the product along with some pictures here once I get it assembled and installed. Oh, another little niggle that comes to mind is the folding LED light over the kitchen sink doesn't have a switch, so the only way to turn it on and off is to plug it in and out. Not a major thing but it would be a nice touch as the plug can be a bit fiddly to reach.
The front storage box on the trailer is designated as a jerry can holder in the sales blurb but we have decided to use this as a wet storage area. Our Porta Potty fits neatly in here along with a 20-litre water drum which we use to fill it on the very odd occasion it's needed. We also store hoses and fittings and toilet chemicals along with an assortment of sponges, chamois, collapsable buckets and the like. There's also enough room for our levelling ramps, they are easy to access from here and this is important when you consider that they are the first thing we'll need when arriving at our chosen campsite for the night.
The storage box on the right-hand side of the camper is divided into two spaces, the rearward space being about double the size of the forward compartment which houses the supplied 1kg fire extinguisher. We drilled out the rivets that hold the fire extinguisher in place as it severely hampers accessibility into what is a fairly moderately sized area. We have purchased a set of plastic tubs, again from the bargain store which sits on top of one another and will be used to hold tools and spare parts for the car and trailer. The fire extinguisher will be re-located next to the fridge slide on the left-hand side of the trailer. The rearward compartment holds two large plastic tubs that were sourced from Bunnings. The bottom tub will be used to hold the gas shower that currently comes with all Black Series Campers along with the walls, floor and roof of the ensuite room. The tub on top holds most of the canvas from the annex along with a bag Peggy Pegs screw in tent pegs and a Bosch cordless drill to screw them in. If you've not heard about Peggy Pegs you can read our review on the product here.
**Ok so this series originally started as out as a running blog of Black Series's performance. In the time we owned we did three further trips and encountered so many problems that I lost interest and we put it on the market**
Issues and difficulties in living with the trailer are as follows:
Water Pump blocked from the factory, we had to remove the diaphragm and clean plastic swarf out to get the pump to do as the manufacturer intended.
On our second trip, we had a circuit breaker trip every time we turned the water pump on, I may have caused this issue when trying to find the initial problem of the pump not working but I don't think so as the pump worked fine for the remainder of that first trip.
The shower unit supplied is unable to be used without sorting your own plumbing fittings out
The wiring from the batteries to the fridge was too small in their gauge and our fridge kept cutting out due to voltage drop experienced. 11.8 Volts at the battery and the fridge cutout set at 10.5 Volts, so the loss was significant.
No battery charging system fitted from the factory means that you have to open up the tent when you get home to access the batteries and connect a maintenance charge to the units.
The tent was very difficult to pack away, resulting re-opening it to re-pack it almost every single time.
The trailer is very, very heavy and I would guess that fully laded we probably exceeded Prado's towing limitation of 2500Kgs
Anyway, we were deeply dissatisfied with the trailer and replaced it with our Patriot X1-GT. Read about that one here if you're interested.
 Straight from the Showroom
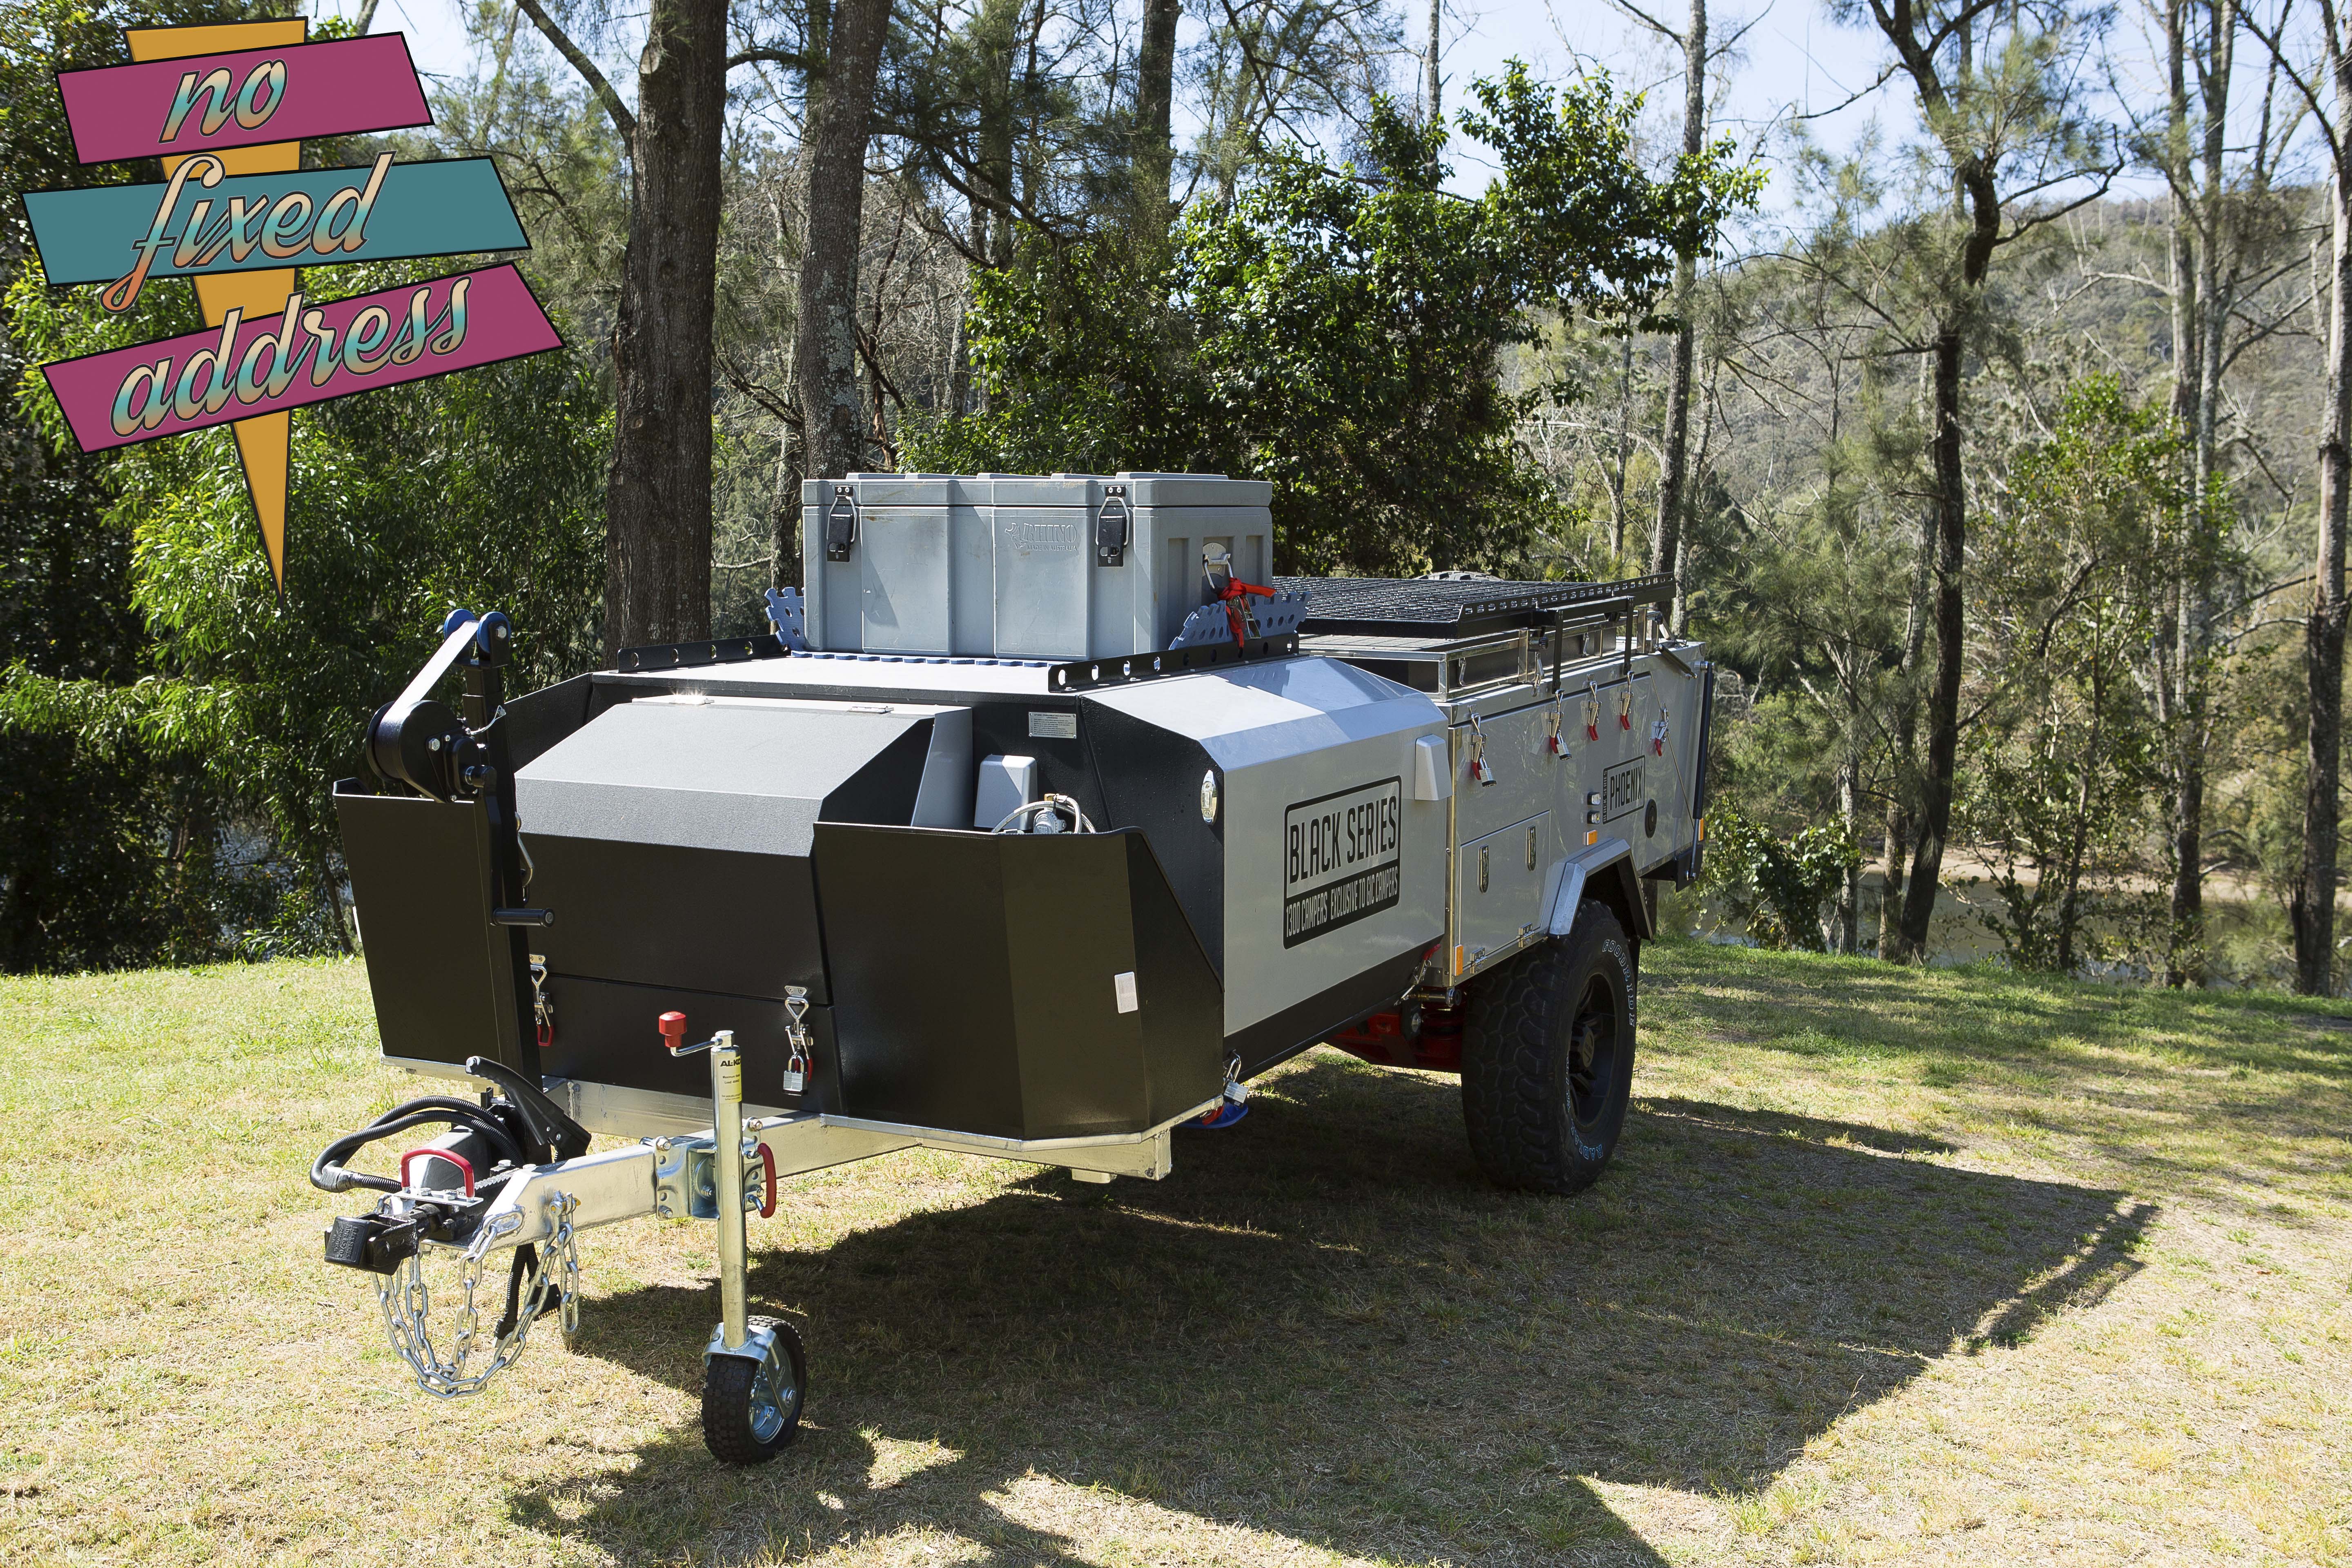
We knew we wanted a hard floor camper trailer for our next big adventure and the value for money range on offer from Black Series Campers was hard to go past. We knew the quality of the components used on the trailer wouldn't be quite as good as some of the other brands on the market but overall we knew that it would suit our needs and more importantly our budget. The trailer itself is a rearward folding hard floor design with ample storage and a fully enclosed, insect-proof annex that measures some 2.40 metres by 6.04 metres. There is also an additional en-suite room suppled that measures about 2.00 metres by 1.50 metres.
 On first impressions, the trailer is an imposing looking thing with the independent suspension pairing up with a set of 16" inch alloy wheels shod with mud terrain tyres raising the trailer dramatically and when packed ready for towing the top of the trailer is almost 6' high, or about 1750mm's for the younger generation. The Pheonix comes standard with electric brakes, an integrated 12 Volt electrical system, an electric water pump, plumbed gas lines from the left-hand side 9kg gas bottle rack to the Dometic 3 Burner stove fitted to the stainless steel slide-out kitchen. The quality of the kitchen looks good and slides in and out with a minimum of fuss although it has to be said that a little more care could have been taken with the shipping of the unit as there are a couple of dents and rub marks in ours. Actually, now that I've raised the subject of pre-delivery damage there are a few marks and scratches on the trailer and it was delivered to us with a solid layer of grime that can only be acquired when something has been left out in the weather. I was disappointed that such little care was taken in terms of pre-delivery inspection and hand over the presentation and I would have expressed my views to our salesman but he chose to hide inside and let one of the other salesman deal with it. Poor form really. We also discovered that the latch that holds the spare wheel bracket secured didn't work as it fouled with the spare tyre and it took about 30 minutes for the boys in the workshop to drill out the rivets and turn it around 180 degrees to solve the issue. This should have been seen too before our delivery as it then leaves you looking for other problems, of which we found a couple. The number plate light wasn't working and required some re-crimping of one of the connectors, again this should have been picked up prior to our arrival. Another minor issue was that one of the reflectors had fallen off and was laying on the ground next to the trailer, as I said a minor thing but it just added to the overall impression that the little things didn't matter to the staff at Black Series and left us wondering what else was overlooked in the assembly phase.
![]() Enough of the whinging, what led us to choose the Pheonix? Well as I said earlier our budget had a lot to do with it and the final price of $18,000 gave us an awful lot of trailer for the money. The other things that mattered were the ease of set up and storage capacity. The tent itself appears to be a fairly easy set-up and pack down and I estimate that we can have it 'sleep ready' in around five minutes. As always the first few times take a little longer, but once you have the routine sorted out it should be a relatively stress-free affair. The staff at Black Series have advised us that due to levelling requirements the trailer needs to be un-hitched for set up but we've purchased some plastic levelling ramps from Supercheap Auto to see if we can't come up with a method of quickly setting up the tent in the event of a quick overnight stop. We found on our last big lap around Oz that there are days where you put in some big miles and find yourself arriving late for a one night stop and need to back it up with an early getaway the next morning, leaving the trailer attached would make this so much easier, we'll keep you posted how it goes.
Enough of the whinging, what led us to choose the Pheonix? Well as I said earlier our budget had a lot to do with it and the final price of $18,000 gave us an awful lot of trailer for the money. The other things that mattered were the ease of set up and storage capacity. The tent itself appears to be a fairly easy set-up and pack down and I estimate that we can have it 'sleep ready' in around five minutes. As always the first few times take a little longer, but once you have the routine sorted out it should be a relatively stress-free affair. The staff at Black Series have advised us that due to levelling requirements the trailer needs to be un-hitched for set up but we've purchased some plastic levelling ramps from Supercheap Auto to see if we can't come up with a method of quickly setting up the tent in the event of a quick overnight stop. We found on our last big lap around Oz that there are days where you put in some big miles and find yourself arriving late for a one night stop and need to back it up with an early getaway the next morning, leaving the trailer attached would make this so much easier, we'll keep you posted how it goes.
We have fitted our Waeco 65 Litre Dual Zone Fridge/Freezer onto the Pheonix's fridge slide and we have around 25cm's left in front of the fridge, with which we'll find some use. The kitchen and pantry area of the trailer is well thought out with a range of sliding drawers varying in size from big enough for a few plates, cups and bowls to 'we could lose stuff in here quite easily! The large compartment to the left of the fridge know has a couple of plastic boxes with handles so we simply lift them out should we need to get to the bottom of the 750mm (approx.) deep drawer. (pics to follow). On the right is the slide-out combination cooktop/sink with a fold-down tap fed by an electric water pump from the 100-litre onboard water tank. Likewise, the stove is fed by a plumbed in gas line. The built cutlery draw looks the business but, bafflingly the spaces for the knives and forks are too short to fit your knives into and the integrated cup holders will only hold a cup when the drawer is open! There's a slide-out bench to the right of the cooktop which makes for a great place to stack your dirty dishes, leaving the sink and sideboard free for food preparation, the folding bench on the rear side of the kitchen as a large area of usable space, negating the need to carry additional folding camp tables. The lid that hides the whole fridge/pantry away whilst travelling has an integrated LED light that is automatically activated upon opening. There is a switchable 12 Volt socket to plug the fridge into but some care will need to be taken to ensure the power cable doesn't get damaged during use of the fridge slide, we'll let you know what if any solution is found to this problem. There are also some 12 Volt outlets being the lockable slide-out kitchen door, one ciga socket and a dual USB socket as well as a connector for folding LED light mounted above the sink.
![]() As the trailer is delivered there are only two methods for charging the dual 100Ah AGM batteries fitted to the Pheonix, either via the 50 amp Anderson plug from the rear of the tow vehicle or, the supplied 160Watt folding solar panels. I feel that this a is a massive oversight to not have either a mains charger, a DC to DC charger or both as standard fitment. Correct battery charging is paramount to their longevity and more information on the subject can be found here. We are undecided as to which way we'll go to solving the charging problem but we will use either CTEK or Redarc Products, between now and then we'll have to be diligent with the usage of the solar panels and ensure we don't leave the Anderson plug connected when stopped as the last thing we want to do is flatten the Prado's starting battery.
As the trailer is delivered there are only two methods for charging the dual 100Ah AGM batteries fitted to the Pheonix, either via the 50 amp Anderson plug from the rear of the tow vehicle or, the supplied 160Watt folding solar panels. I feel that this a is a massive oversight to not have either a mains charger, a DC to DC charger or both as standard fitment. Correct battery charging is paramount to their longevity and more information on the subject can be found here. We are undecided as to which way we'll go to solving the charging problem but we will use either CTEK or Redarc Products, between now and then we'll have to be diligent with the usage of the solar panels and ensure we don't leave the Anderson plug connected when stopped as the last thing we want to do is flatten the Prado's starting battery.
The trailer towed with a minimum of fuss on the 30-kilometre drive home and reversing was a snap with the axle being toward the rear of the trailer meaning that it responds slowly to driver input, just what you need when reversing into difficult places. We are taking the trailer for its first trip, a weekender just to get a feel for setting the whole thing up to great a little spot two hours drive away on the South Coast of New South Wales. It will be interesting to see what modifications we find we'll need to carry out before heading off on our next 'big lap'.
All demo content is for sample purposes only, intended to represent a live site. All content images are licensed from their respective sources for exclusive use on this demo only.